
:max_bytes(150000):strip_icc():format(jpeg)/I-Tried-TK-Ways-to-Reheat-Pizza-FT-BLOG0925-Hero-a5ffe30d19d04e6d885a2ed8245d613a.jpg)
I love having leftover pizza in the fridge — I’ll even intentionally over-order to ensure I have extra slices on hand. They make for a slam-dunk breakfast or lunch the next day, something I look forward to almost as much as the just-baked pie from the night before. And while cold leftover pizza has its time and place (ahem, the morning after a late night spent indulging), properly reheated pizza tastes far better. When done well, it can bring cold pizza back to life, restoring it to fresh-from-the-pizzeria flavor and texture. Done poorly, though, it can wring the life out of your slices and leave you chewing shoe leather.
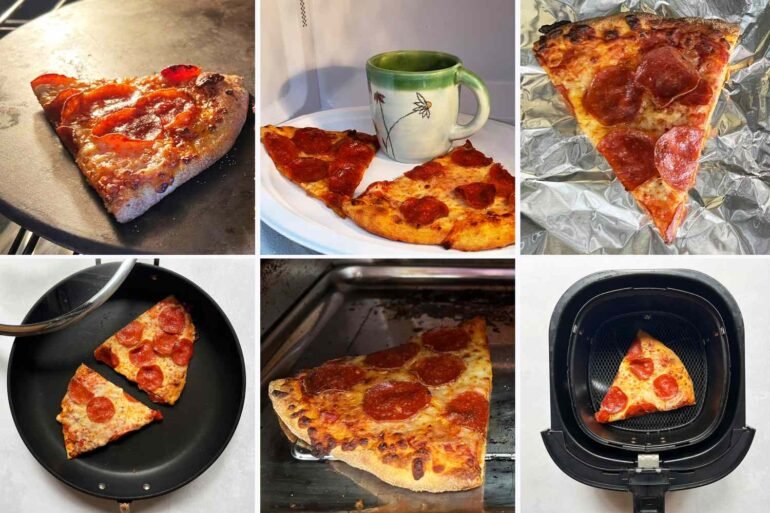
To that end, I set about testing six ways of reheating cold leftover pizza — using the microwave, oven, toaster oven, grill, air fryer, and stovetop. Read on to discover which techniques truly delivered.
A word about my method
The starting point for all of these methods was day-old, refrigerated pizza. I used pepperoni pizza with New York–style crust (thin and foldable) from Domino’s to test how both the crust and toppings would hold up to reheating. I tested two slices for each method and made sure to taste the outer crust, middle, toppings, and interior point of each slice.
Microwaving pizza
Food & Wine / Ann Taylor Pittman
Cook time: 1 minute
Total time: 1 minute 15 seconds
Rating: 4/10
Method: I saw several recommendations online for placing a microwave-safe mug or cup of water next to the pizza as you heat it in the microwave to prevent the crust from getting soggy or tough, so I decided to give that method a try. I placed two slices of cold pizza on a microwave-safe paper plate with a mug of water. I cooked on High in my 1100-watt microwave in 30-second increments until the pizza was hot (1 minute).
Results: This technique did no favors for the pizza. The outer crust was tough and overly chewy, and the pizza heated unevenly, with some bites piping hot and others lukewarm.
Pros: This is the easiest and fastest way to reheat pizza. If you’re particularly hangry and need your pizza pronto, go for it, but know you’ll be making concessions.
Cons: The pizza’s texture suffers when heated in the microwave, with the outer crust becoming hard, tough, and unpleasant to chew. If you’re in this big of a hurry, you might be better off eating cold pizza.
Heating pizza in a toaster oven
Food & Wine / Ann Taylor Pittman
Cook time: 6 minutes
Total time: 11 minutes
Rating: 7/10
Method: Preheat the toaster oven using the Bake or Reheat setting (I went with the former) to 350°F. Place the cold leftover pizza on the toaster oven’s baking sheet, and cook for about 6 minutes to reheat.
Results: The pizza heated evenly, and although the crust wasn’t exactly crisp, it wasn’t soggy, either. It was chewy-tender with a hint of crispiness at the outer edge — not the ideal texture but far from the worst (I’m looking at you, microwave).
Pros: The small scale of the toaster oven means it preheats quickly; mine was ready in 5 minutes. It’s an energy-efficient method that doesn’t use as much power or fuel as the oven or grill.
Cons: The toaster oven can accommodate 3 to 4 slices, max — so if you have a lot of pizza to reheat, you should use a different method. The texture of the reheated pizza is fine but not particularly crispy.
Grilling pizza over flames
Food & Wine / Ann Taylor Pittman
Cook time: 5 minutes
Total time: 25 minutes
Rating: 7.5/10
Method: Heat an outdoor grill to medium-high. Arrange cold leftover pizza on a piece of heavy-duty foil, then place the foil on the grill rack. Close the lid, and grill over direct heat until the cheese melts and the pizza feels hot, 4 to 6 minutes.
Results: The pizza reheated evenly, with a crispy bottom crust and tender-chewy outer crust. The cheese was gooey and stretchy, and the pepperoni fat bubbled and crisped.
Pros: You’ll get evenly heated slices with great texture. The surface area of the grill can also accommodate many pizza slices, so if you have a lot of leftovers, this is a useful method.
Cons: It seems like a fair amount of trouble to heat up the grill just to reheat leftovers. I used my outdoor gas grill, and it took 20 minutes to preheat it to medium-high (450°F), a bit longer than it took my oven to heat for my oven-reheating test. I suppose if you wanted to grill some lettuce, asparagus, or broccoli for an accompaniment, it would be worth it to fire up the grill to reheat the pizza, too.
Warming on a pizza stone in the oven
Food & Wine / Ann Taylor Pittman
Cook time: 3 minutes
Total time: 18 minutes
Rating: 8/10
Method: Place a pizza stone (or large upside-down cast-iron skillet) in the oven and preheat to 475°F. When the oven is ready, carefully arrange cold pizza slices on the pizza stone or skillet, and cook for 2 to 4 minutes for thin-crust pizza.
Results: This pizza was almost as good as a fresh pie. The bottom of the crust was wonderfully crisp, while the topping heated evenly. The cheese was gooey and the pepperoni was crisp.
Pros: The oven method revived the leftover pizza’s texture, bringing it to nearly just-baked levels. It’s also versatile: You could reheat as little as a single slice or up to a whole pie this way.
Cons: While my oven preheated to a high temperature in just 15 minutes, other ovens might take longer to preheat. As I discovered through my testing, there are quicker methods that deliver even better results. Also, you need a pizza stone (or a large cast-iron skillet) for this method.
Reheating in an air fryer
Food & Wine / Ann Taylor Pittman
Cook time: 2 1/2 minutes
Total time: 2 1/2 minutes
Rating: 9/10
Method: Place the cold pizza in the air fryer basket in a single layer. (I used my Phillips basket-style air fryer, not a toaster oven–style fryer.) Air-fry the leftover pizza at 350°F for 2 to 4 minutes.
Results: The reheated pizza slices were fantastic, with a super-crispy crust. Some of the pepperoni actually cupped up a bit, and each circle of meat was wonderfully crisp around the edges. The tip of each of the slices was the teensiest bit dry, but otherwise the texture was perfect.
Pros: My tabletop, basket-style air fryer does not need to be preheated, so this was a very fast method. It yielded an absolutely irresistible texture on the crust and meat.
Cons: I could only fit one slice into the basket at a time. However, I found the texture of the pizza to be well worth this limitation.
Cooking in a covered skillet
Food & Wine / Ann Taylor Pittman
Cook time: 2 minutes
Total time: 4 1/2 minutes
Rating: 10/10
Method: I followed the method we’ve touted before: Heat a large nonstick skillet (I used an All-Clad pan) until water droplets dance on the surface. Add pizza to the pan with roughly 8 water droplets, cover the pan, and heat for about 2 minutes.
Results: As advertised, the water vapor helped to prevent the toppings from drying out. The cheese was wonderfully gooey, and the crust re-crisped without becoming tough. The outer crust maintained some of the pleasant, intentional chew that it started with when freshly baked.
Pros: This method is quick, produces an ideal texture for both the toppings and crust, and can handle a few slices of pizza at a time.
Cons: There are some space limitations, depending on the size of your skillet. If you have a lot of pizza to reheat, you might want to consider another method.
Final takeaways
Some of the fastest methods are also the best, restoring the toppings and crust to nearly just-baked freshness. The covered skillet technique ultimately yields the ideal texture, but air-frying is a surprisingly effective method — especially if you’re just reheating a single slice.
Ann Taylor Pittman
2025-09-13 12:00:00