
:max_bytes(150000):strip_icc():format(jpeg)/Ways-to-Cook-Hard-BoiledEggs-FT-DGTL1025-Hero-3f8d6b0e811440dbb68c5dc364564b4e.jpg)
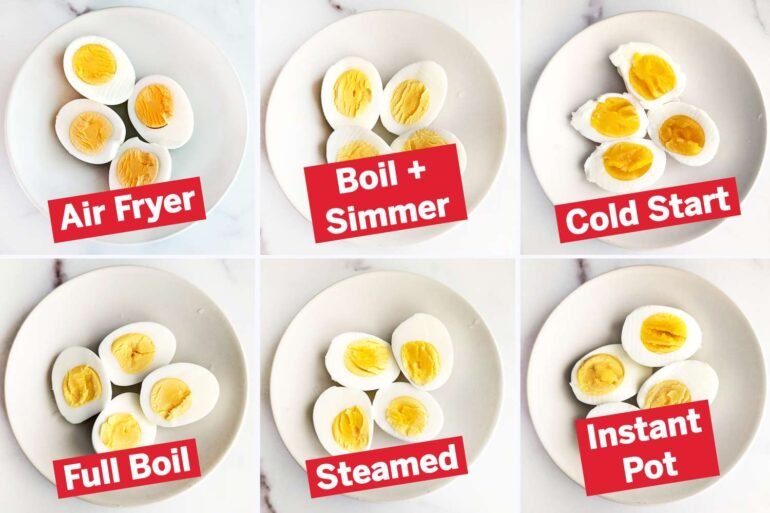
- Steaming is the most reliable and consistent way to make perfect hard-boiled eggs — easy to peel, with creamy yolks and firm yet tender whites.
- Boiling, then simmering, is an excellent runner-up that delivers similar results, though you’ll need to handle the eggs carefully to prevent cracking.
- Modern appliances like the Instant Pot and air fryer can produce good eggs, but they’re no more convenient or effective than classic stovetop methods.
Making hard-boiled eggs is one of the first techniques a home cook learns. At its most basic, it involves adding some eggs to a pot of boiling water and cooking them until the whites are firm and the yolks are set.
That’s how I learned to make them as I watched my mom put together her delicious deviled eggs. But over the years, I’ve worked with chefs who have very different techniques that they all claim to produce “perfect” hard-boiled eggs. In fact, when I worked in the Food & Wine test kitchen years ago, a fellow test cook shared a technique for hard-boiled eggs that blew my mind, and which I still use to this day (more on that below).
To find out which methods are really all they’re cracked up to be, I bought a few dozen eggs and tested six different ways to cook hard-boiled eggs — from the classic boiling method to unconventional approaches like air-frying.
A word on my method
As a control for these tests, I started with large eggs straight from the refrigerator. I used a couple different brands of eggs that are widely available and consistent in size: Pete and Gerry’s Organic Eggs and Vital Farms Pasture-Raised Eggs. I tested each method at least twice, and a third time if I noticed strong inconsistencies between the two tests. For all stovetop methods I cooked over a gas burner. I didn’t use additional ingredients, but I plunged all batches into an ice bath for 10 minutes before peeling.
The goal was a classic hard-boiled egg (no jammy yolks) that I could use for salads, snacks, or a quick breakfast. I set the following criteria: A good hard-boiled egg has a firm yet tender white that’s not rubbery and slightly creamy yolks that are set but not chalky. It also doesn’t suffer from overly sulfur-forward flavors — a sign an egg is overcooked.
I judged each method on consistency and quality from batch to batch, ease of use, taste, texture, and peelability.
Simmering the eggs (cold start method)
Adam Dolge
Cook time: 20 minutes
Total time: 25 minutes
Rating: 6/10
Method: This is the method my wife always uses, and it’s probably going to lead to some friendly feuding after she sees this list. Place eggs in a medium pot covered by at least 1 inch of cold water, then bring the pot to a boil. Reduce heat to maintain a low simmer. My wife always cranks the heat up to high and sets a timer for 20 minutes with no regard for how long it takes the water to come to a boil. For a more exacting method, I let the eggs gently simmer for 10 minutes before chilling them in an ice bath.
Results: This wasn’t a bad method, per se, but the biggest problem was the inconsistency between batches. For starters, different cooktops take varying times to bring water to a boil. That creates some serious variables — the total time the eggs sit in near-boiling water could range from 30 seconds to a few minutes.
Even using the same burner, I noticed inconsistency between batches. On my first test, I struggled to peel the eggs, and the yolks were overcooked. The next two batches were somewhat better, but some of the eggs were more cooked than others. These batches were also the hardest to peel. The texture of the whites, however, was good with each batch. They were firm but not rubbery and pleasantly soft and tender.
Pros: You don’t need to fuss with boiling water since you start the eggs in a pot of cold water. Compared to other methods, this is a relatively hands-off technique.
Cons: The results are very inconsistent. Cook time could vary depending on the type of range or cooktop. They are also the most difficult to peel.
Cooking the eggs in an air fryer
Adam Dolge
Cook time: 15 minutes
Total time: 23 minutes
Rating: 7/10
Method: I used both a basket-style and toaster-style air fryer, both set to 250°F, and added the eggs once the preheat cycle finished. I cooked each batch for 15 minutes before chilling in the ice bath. I have an Instant Vortex Plus (basket-style) and Ninja Flip Toaster Oven & Air Fryer, and each could fit about a dozen eggs. I trusted the process and avoided opening either air fryer as the eggs cooked.
Results: I was skeptical of this method since it technically produces baked eggs, but it worked, mostly. The basket air fryer, in particular, produced an egg that was ideal — tender whites and well-cooked yolks without that chalky texture that can happen when overcooked. The results from the toaster-oven style were a bit more mixed, with some whites becoming too rubbery due to clear hot spots in the oven. Interestingly, the eggs in both air fryers had some crusty bits on the shell after cooking, perhaps from calcium buildup on the shell.
Pros: The basket air fryer produced well-cooked eggs that were relatively easy to peel. This is another mostly hands-off cooking method.
Cons: The toaster oven air fryer didn’t quite work — the egg’s position seemed to matter for consistency. All air fryers will require different cook times, so you’ll need to do some experimenting with your specific model.
Cooking the eggs in an Instant Pot
Adam Dolge
Cook time: 20 minutes
Total time: 25 minutes
Rating: 7.5/10
Method: I placed the wire steamer basket in the bottom of an Instant Pot and added enough water to come up just below the bottom of the basket (1 to 2 cups of water). Then I placed the eggs on the rack, closed the lid, sealed it, and set it to high pressure with a 5 minute cook time. Once it was done, I let it naturally release for 5 minutes before switching the steam valve to vent.
Results: I found this method most surprising. I set the machine and walked away until I heard the timer go off, and came back to perfectly cooked, easy-to-peel eggs. You could probably fit a full dozen eggs, depending on the model. However, there was some inconsistency between batches — some eggs were a bit more overcooked than others. My biggest gripe with this method: Pulling out my Instant Pot from the cabinet just to make a handful of hard-boiled eggs feels tedious and a bit silly, especially when other methods produce better results.
Pros: Once you set up the Instant Pot, you can walk away and work on other things. This method produces eggs that are well-cooked and easy to peel. You can also easily cook a dozen eggs at once.
Cons: There’s a bit of a time investment needed to get the eggs situated properly. If you need to step away once the eggs are finished cooking but the seal hasn’t broken, they will overcook quickly.
Boiling the eggs
Adam Dolge
Cook time: 12 minutes
Total time: 20 minutes
Rating: 8/10
Method: Simply bring a medium pot of water to a boil over high heat, then carefully add the eggs using a slotted spoon (I used a spider strainer to gently drop them in). I boiled the eggs for 12 minutes, then used a spider strainer to transfer them to their ice bath. It’s important to use a pot with enough water so that it doesn’t stop boiling when you add the cold eggs. For me, that meant using at least 12 cups of water for four eggs.
Results: The results were excellent cooked eggs with soft yet set whites and creamy yet fully cooked yolks. They also peeled with ease. While these last three methods on the list all produced very solid results, this one ran into a couple issues that the top two did not. Some of my eggs cracked as they cooked, likely from getting jostled around in the pot. It’s important to remove the eggs from the water instead of draining them into a colander, as they’ll be more prone to breaking if you dump them from the pot.
Pros: This is a very consistent method that should work for anyone since there are virtually no variables in boiling water (aside from elevation). It produces excellent hard-boiled eggs that are some of the easiest to peel.
Cons: You need to be extra-careful when adding the eggs to boiling water, as they are prone to breaking. Some of my eggs cracked as they boiled.
Boiling then simmering the eggs
Adam Dolge
Cook time: 12 minutes
Total time: 20 minutes
Rating: 9.5/10
Method: For this method, I followed the exact same process as the previous boiling technique until I added the eggs, at which point I reduced the water to a low simmer. The key is carefully adding the eggs with a slotted spoon or spider strainer while the water is boiling to prevent the eggs from breaking, but also to ensure the water stays hot. I simmered the eggs, partially covered with a lid, for exactly 12 minutes, then quickly and carefully gave them a cold plunge in ice water.
Results: This technique produced quintessential hard-boiled eggs with perfectly firm whites and yellows that retained a good amount of moisture. I had no issues removing the shells, and aside from moving the eggs in and out of very hot water, there’s really no challenge or even potential variations in this method (aside from elevation-related tweaks to cook time). The big jump up in the scoring for this method comes down to consistency. Every batch was perfect. I can’t make the same claim to all other methods up until this point.
Pros: Each batch produced perfectly cooked hard-boiled eggs. There is no room for variations so long as there is enough water in the pot and you have good control of the heat on your cooktop. The eggs were also very easy to peel.
Cons: You still need to be careful when adding and removing the eggs from the pot of water to avoid breaking the eggs or burning your hand.
Steaming the eggs
Adam Dolge
Cook time: 12 minutes
Total time: 20 minutes
Rating: 10/10
Method: This is the method my former colleague in the Food & Wine test kitchen showed me many years ago — and it happens to be one of the easiest. I added about 2 inches of water to a pot fitted with a steamer basket, ensuring the water didn’t come through the basket. Once the water came to a boil, I added eggs to the basket, covered the pot, and reduced the temperature to maintain a low simmer. The eggs cooked for 12 minutes then went into the ice bath.
Results: These eggs were identical in quality to eggs from the runner-up method. They were also the easiest of the bunch to peel, but the main reason I ranked this method highest is ease of use. Steamed eggs are not prone to breakage since you can add them to the steamer basket by hand. As such, this is my favorite technique for consistently excellent eggs without the need to drop them in and out of boiling or simmering water.
Pros: This method is very easy to execute and produces excellent cooked eggs. These eggs were are also the easiest to peel of any method I tried.
Cons: Not everyone owns a steamer basket, but it’s a worthwhile and inexpensive investment. You could also buy a dedicated egg cooker for similar results.
Final takeaways
Just about all of these methods produced good hard-boiled eggs that were mostly easy to peel. However, the most consistent results from batch to batch came from the old-fashioned techniques of either boiling and simmering the eggs in a large pot of water or simply steaming them. Sometimes classic really is best.
Adam Dolge
2025-10-20 10:30:00